


Avada Themebuilt-in Avada Forms plugin that makes it easy to build forms of all kinds. Whether it's a basic contact form, a complex multi-step form, or a form that includes conditional logic, it's easy to implement with Avada's interface and features. In this article, we'll cover how to create a customized form from scratch using the Avada form builder and add it to your website.
1. Creating new forms
In the WordPress dashboard, go to Avada Forms maybe Form builderClick Creating a new form. On the popup page, we can name the form. For example, let's name the form "Guest Contributor"and then click Creating a new formThe
![Image [1] - How to quickly build a professional contact form with Avada Forms (graphic details)](http://gqxi.cn/wp-content/uploads/2025/04/20250415140431275-image.png)
In Avada settings, you can choose to use the Avada Live as the default editor so that you can visualize the effect of changes on the page.
![Image [2] - How to quickly build a professional contact form with Avada Forms (graphic details)](http://gqxi.cn/wp-content/uploads/2025/04/20250415140451276-image.png)
2. Adding form elements
In the form editor, there are two options: you can start from the Avada Studio Choose one of the pre-built forms in or you can build your own form from scratch. For the purpose of this demo, we will build the form from scratch.
- Adding Containers: Click Adding Containers, and choose a two-column layout, which makes it easy to place multiple form elements.
![Image [3] - How to quickly build a professional contact form with Avada Forms (graphic details)](http://gqxi.cn/wp-content/uploads/2025/04/20250415142151680-image.png)
- Adding Text Fields: Add a text field element to collect the user's name.
![Image [4] - How to quickly build a professional contact form with Avada Forms (graphic details)](http://gqxi.cn/wp-content/uploads/2025/04/20250415142232303-image.png)
exist Field labels Enter "First Name" and set it as a required field.
![Image [5] - How to quickly build a professional contact form with Avada Forms (graphic details)](http://gqxi.cn/wp-content/uploads/2025/04/20250415142526942-image.png)
An icon can be added to the field to select the "Person" icons for added visual interest.
![Image [6] - How to quickly build a professional contact form with Avada Forms (graphic details)](http://gqxi.cn/wp-content/uploads/2025/04/20250415142356342-image.png)
- Add additional fields: Continue to add Last Name,Email Address respond in singing Phone Number Fields. Set appropriate labels for each field and make sure they are all required. Each field can be set with an icon, for example Email Fields use the envelope icon.
![Image [7] - How to quickly build a professional contact form with Avada Forms (graphic details)](http://gqxi.cn/wp-content/uploads/2025/04/20250415142639172-image.png)
- Adding checkbox fields: In order to allow users to select their interestedInternet audio subscription servicecategory, we add a checkbox field and set the Podcast Categories Tab. In the options, add Business,Lifestyle respond in singing Design As an option.
![Image [8] - How to quickly build a professional contact form with Avada Forms (graphic details)](http://gqxi.cn/wp-content/uploads/2025/04/20250415150030319-image.png)
![Image [9] - How to quickly build a professional contact form with Avada Forms (graphic details)](http://gqxi.cn/wp-content/uploads/2025/04/20250415150132245-image.png)
![Image [10] - How to quickly build a professional contact form with Avada Forms (graphic details)](http://gqxi.cn/wp-content/uploads/2025/04/20250415150520963-image.png)
- Adding a file upload field: To allow users to submit personal information, we add a file upload field and set a file size limit (e.g. 2MB) and allowed file types (e.g. JPEG).
![Image [11] - How to quickly build a professional contact form with Avada Forms (graphic details)](http://gqxi.cn/wp-content/uploads/2025/04/20250415151059435-image.png)
![Image [12] - How to quickly build a professional contact form with Avada Forms (graphic details)](http://gqxi.cn/wp-content/uploads/2025/04/20250415151258330-image.png)
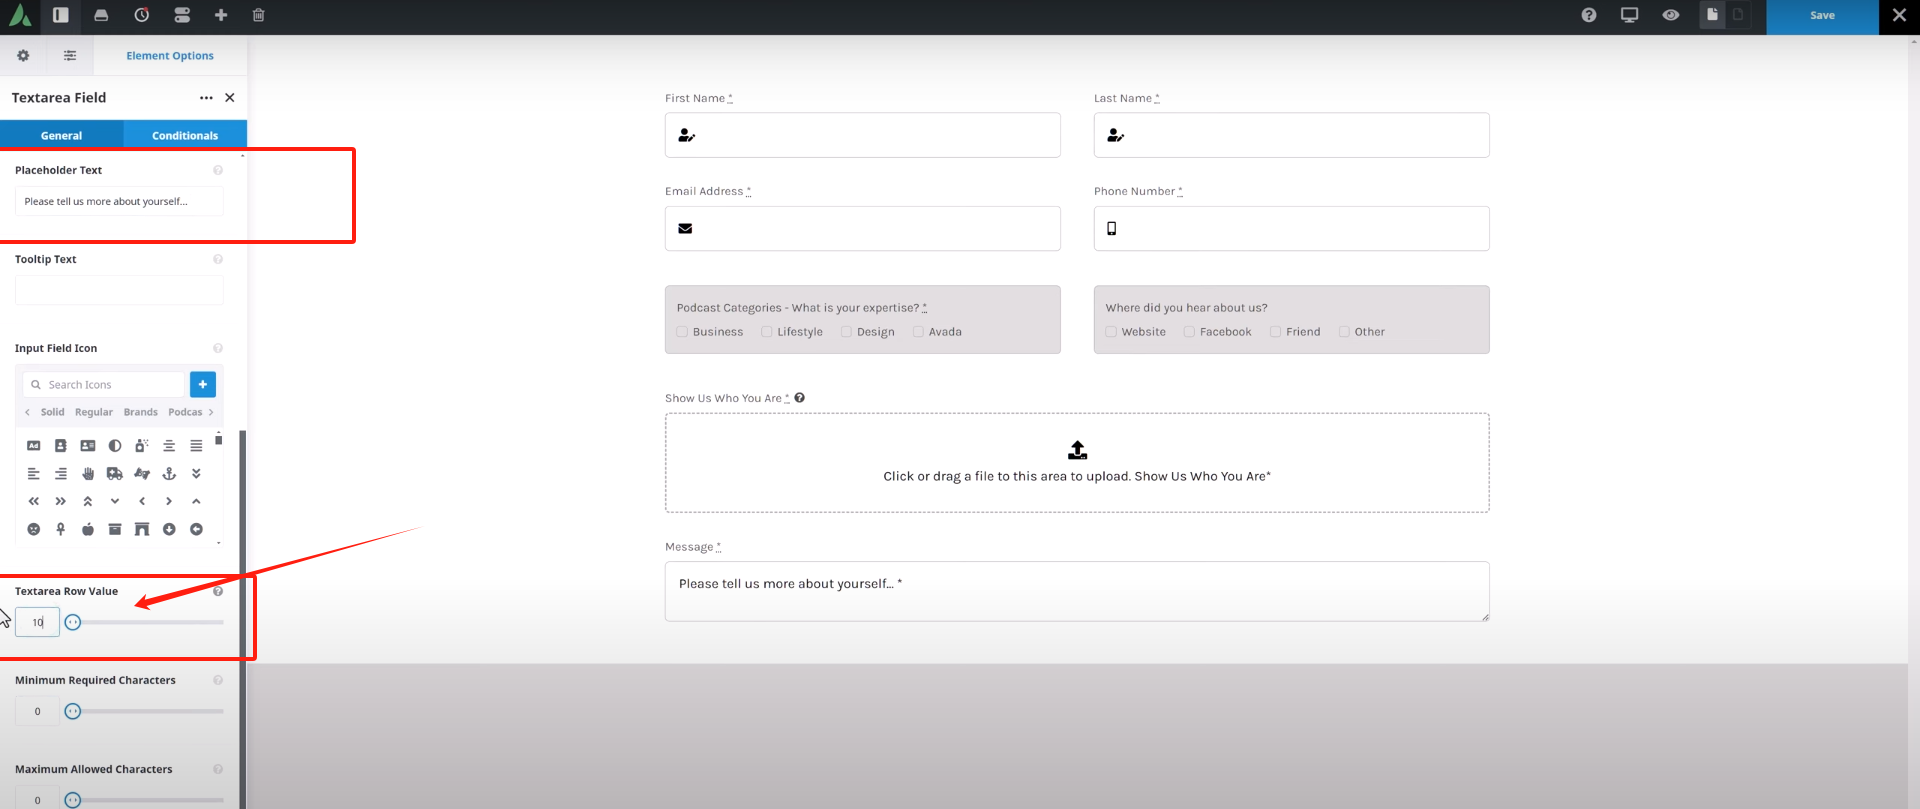
- Adding Text Area Fields: At the end of the form, we add a Message field to allow the user to enter more detailed information. To encourage users to provide more content, we set the number of lines in the text area to 10.

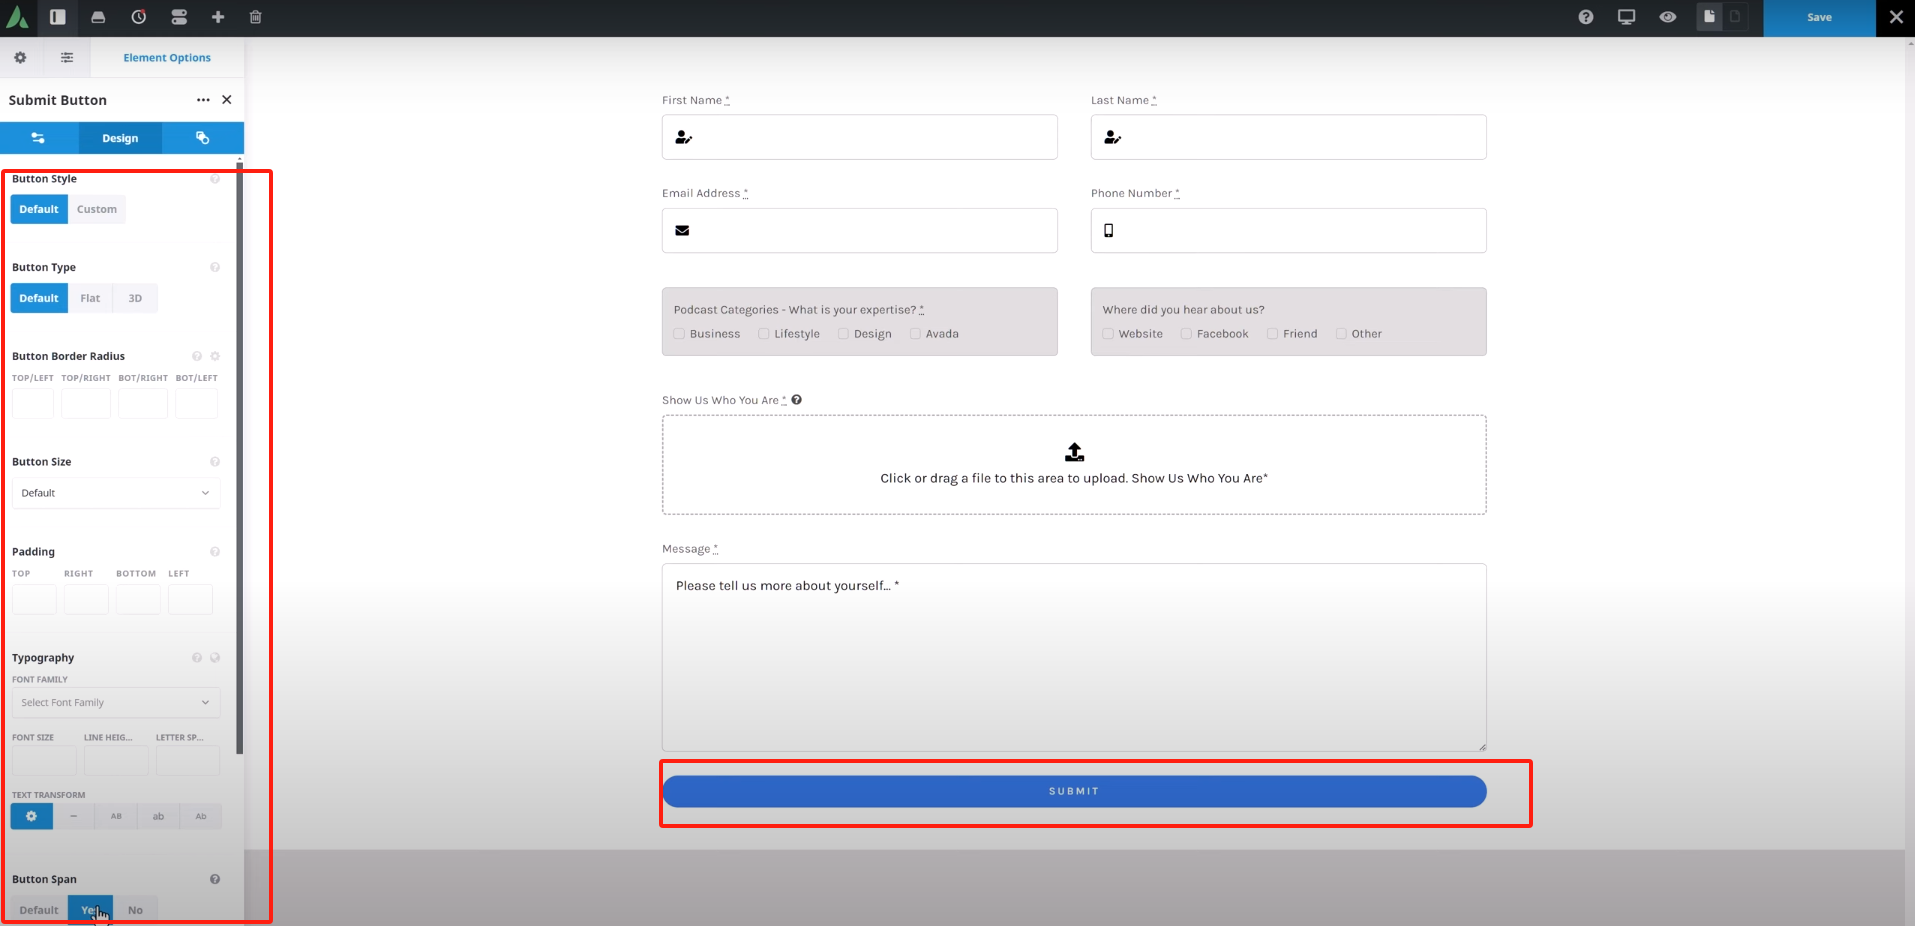
- Add a submit button: Add a Submit buttonand select the default button style.

3. Setting up form notifications
Once the form is built, we need to set up the notification feature after the form is submitted:
- Setting up e-mail notifications: in notifications tab, select Submit to email, and set the address to send the e-mail to. AlsoSetting up mailsubject and content, using placeholders to insert user-filled form information.
![Image [17] - How to Quickly Build a Professional Contact Form with Avada Forms (Graphic Details)](http://gqxi.cn/wp-content/uploads/2025/04/20250415154951457-image.png)
- Setting up an autoresponder: If you want users to receive a confirmation email after submitting a form, you can set up an auto-reply function. The content of the notification can be customized, such as
" Thank you for submitting, we will be in touch soon!" The
![Image [18] - How to Quickly Build Professional Contact Forms with Avada Forms (Graphic Details)](http://gqxi.cn/wp-content/uploads/2025/04/20250415155414374-image.png)
4. Customizing form appearance
To make the form consistent with the overall design style of the site, we can use the exterior condition tab to customize the form'sbackground color, field colors, button styles, etc.
![Image [19] - How to quickly build a professional contact form with Avada Forms (graphic details)](http://gqxi.cn/wp-content/uploads/2025/04/20250415155848563-image.png)
5. Adding the form to the page
After completing the form design, save and return to the page to edit it. The form can be edited on the page using the Avada form elements to insert the created form. Select a suitable location on the page to add the form and associate it with a button or link on the page.
![Image [20] - How to Quickly Build Professional Contact Forms with Avada Forms (Graphic Details)](http://gqxi.cn/wp-content/uploads/2025/04/20250415155714715-image.png)
![Image [21] - How to Quickly Build a Professional Contact Form with Avada Forms (Graphic Details)](http://gqxi.cn/wp-content/uploads/2025/04/20250415155739278-image.png)
![Image [22] - How to Quickly Build Professional Contact Forms with Avada Forms (Graphic Details)](http://gqxi.cn/wp-content/uploads/2025/04/20250415160615284-image.png)
summarize
utilization Avada Form BuilderAvada's forms can be easily created and customized. Whether it's a simple contact form or a complex multi-step form, it can be done with Avada's intuitive interface and powerful features. Go through the steps in this article and learn not only how to create forms, but also how to set up notifications, submission options, and customize the appearance to ensure that your forms are functional and aesthetically pleasing.
For more WordPress related tutorials and information, follow thePhoton fluctuation network, has the most comprehensive WordPress tutorials and the most activeWordPress Exchange CommunityThe

Link to this article:http://gqxi.cn/en/50186The article is copyrighted and must be reproduced with attribution.


![Emoji[chi]-Photonflux.com | Professional WordPress repair service, worldwide, rapid response](http://gqxi.cn/wp-content/themes/zibll/img/smilies/chi.gif)
![Emoji[xigua]-Photonflux.com | Professional WordPress Repair Service, Worldwide, Fast Response](http://gqxi.cn/wp-content/themes/zibll/img/smilies/xigua.gif) [Images]
[Images]


No comments